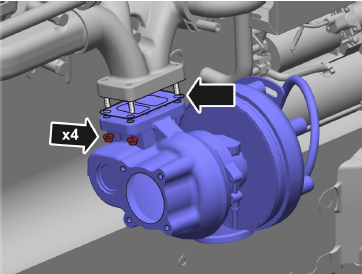
Turbo, Change
TAD752GE, TAD753GE, TAD754GE
Exhaust pipe removed.
Removal
1 Remove the intake pipe.

2 Remove the charge air pipe to the charge air cooler.

3 Remove the oil delivery pipe and the oil return pipe.

4 Remove the turbocharger and gasket.

Installation
5 Install the turbocharger with a new gasket.
Tightening torque: 40 Nm (29.5 lbf. ft.)

6 Install the turbocharger oil delivery pipe (1).
Tightening torque: 39 Nm (28.8 lbf. ft.)

7 Install the turbocharger oil return pipe (2).
Tightening torque: 30 Nm (22.1 lbf. ft.)
8 Install the charge air pipe.

9 Install the inlet pipe.

10 Check function.
TAD752GE, TAD753GE, TAD754GE
Tools:
9996666 Nipple
9998339 Manometer
9998493 Hose
1 Remove the plug.

2 Connect 9996666 Nipple and 9998339 Manometer. Where necessary, 9998493 Hose may be used between the nipple and the manometer. Test run the Volvo engine at full load in order to check max boost air pressure.
TAD752GE: 189 kPa (139.4 psi)
TAD753GE: 200 kPa (147.5 psi)
TAD754GE: 233 kPa (171.9 psi)
3 Remove 9998339 Manometer and 9996666 Nipple.

4 Install the plug.
Charge Air Pressure, Check
TAD550GE, TAD551GE, TAD750GE, TAD751GE
Tools:
9996666 Nipple
9998339 Manometer
9998493 Hose
1 Remove the plug.P0015271

2 Fit 9996666 Nipple and 9998339 Manometer. Where necessary, 9998493 Hose may be used between the nipple and the manometer. Test run the engine at full load in order to check max boost air pressure.
TAD550GE: 159 kPa (23.1 psi)
TAD551GE: 168 kPa (24.4 psi)
TAD750GE: 188 kPa (27.3 psi)
TAD751GE: 197 kPa (28.5 psi)
3 Remove 9998339 Manometer and 9996666 Nipple.

4 Install the plug.
Air Filter, Change
TAD752GE, TAD753GE, TAD754GE
1 Remove the filter housing cover/end panel.
2 Remove the air filter.
3 Clean inside the housing.

4 Where necessary, remove the air filter housing inner part and clean.

Installation
5 Replace the air filter housing inner part.
6 Install a new air filter.

7 Install the filter housing cover/end panel.

Pre-heating, Change
TAD752GE, TAD753GE, TAD754GE
Removal
NOTICE! The main switch must be in the off position before work is begun.
1 Remove the e-EGR check valve; refer to Nonreturn valve e-EGR, change page 163.

2 Remove the connector from the preheater element.

3 Remove the preheater with gasket.
Installation
4 Install in reverse order.
Tightening torque: 30 Nm (22.1 lbf.ft.)

Coolant Level, Checking andTopping Up
TAD550GE, TAD551GE, TAD750GE, TAD751GE
IMPORTANT!
Only use the coolant recommended by Volvo Penta.
CAUTION!
Avoid opening the filler cap for engine coolant system (freshwater cooled engines) when the engine is still hot. Steam or hot coolant can spray out as system pressure is lost.
NOTICE! Mix the correct amount of coolant in advance, to ensure that the cooling system is completely filled. Refer to Administration page 17.
IMPORTANT!
Do not start the engine until the system is vented and completely filled.
1 Check that all drain points are closed.
2 Fill coolant until it is approx 50 mm (2") below the top lip of the filler pipe.

Filling a completely empty system
NOTICE! Refer to the previous items.
3 Vent via the venting nipple, coolant pump.
4 Start the engine when the cooling system has been completely filled and vented. Open any venting taps a short while after starting, to allow trapped air to escape.

5 Carry out a follow-up inspection of the coolant level after approx 1 hour's operation.
Coolant Level, Checking andTopping Up
TAD752GE, TAD753GE, TAD754GE
IMPORTANT!
Only use the coolant recommended by Volvo Penta.
CAUTION!
Avoid opening the filler cap for engine coolant system (freshwater cooled engines) when the engine is still hot. Steam or hot coolant can spray out as system pressure is lost.
NOTICE! Mix the correct amount of coolant in advance, to ensure that the cooling system is completely filled. Refer to Administration page 17.
IMPORTANT!
Do not start the engine until the system is vented and completely filled.
1 Check that all drain points are closed.
2 Open the filler cap. Do not open the pressure cap.

3 Fill with coolant, so that the level is between the MIN and MAX marks on the expansion tank. Filling a completely empty system
NOTICE! Refer to the previous items.
4 Start the engine when the cooling system has been completely filled and vented. Open any venting taps a short while after starting, to allow trapped air to escape.

5 Carry out a follow-up inspection of the coolant level after approx 1 hour's operation.
Coolant, Change
TAD550GE, TAD551GE, TAD750GE, TAD751GE
Coolant, draining
IMPORTANT!
Check that all coolant drains out. Deposits may be found inside the drain tap/plug that need to be cleaned away. There is otherwise a risk that coolant remains causing severe damage.
NOTICE! Be prepared to gather up fluids.
1 Remove the filler cap.
2 Open all drain points:
• beneath the radiator.
• engine block, right side.
• any other taps or plugs at the lowest points of the coolant system.
3 Close any taps and screw in any removed drain plugs.

4 Refill with new, Volvo Penta-recommended cooling fluid. Refer to Administration page 17 and Coolant Level, Checking and Topping Up page 185.
Coolant, Change
TAD752GE, TAD753GE, TAD754GE
Tools:
9996049 Draining hose
IMPORTANT!
Check that all coolant drains out. Deposits may be found inside the drain tap/plug that need to be cleaned away. There is otherwise a risk that coolant remains causing severe damage.

NOTICE! Be prepared to gather up fluids.
1 Connect 9996049 Draining hose.
2 Remove the filler cap.
3 Open all drain points:
• beneath the radiator.
• engine block, right side.
• any other taps or plugs at the lowest points of the coolant system.
4 Close any taps and screw in any removed drain plugs.

5 Refill with new, Volvo Penta-recommended cooling fluid. Refer to Administration page 17 and Coolant Level, Checking and Topping Up page 185.
Copyright © Guangxi Dingbo Generator Set Manufacturing Co., Ltd. All Rights Reserved | Sitemap
Update cookies preferences