Oil filter, Change
TAD752GE, TAD753GE, TAD754GE
Removal
Engine oil drained.
1 Remove the oil filter cover (1) and filter.
2 Remove the O-ring (2) and filter (3).

Installation
3 Check that the filter sealing surface is clean.
4 Install a new filter (3) and a new O-ring (2).
5 Install the filter cover (1) and filter. Tightening torque: 40 Nm (29.5 lbf. ft.)
6 Fill with Volvo engine oil; refer to Administration page 16.
7 Start the engine and check that there is oil pressure.
8 Check that no leakage is present.
9 Stop the engine and check the oil level after a couple of minutes.
Oil Filter Housing, Change
TAD752GE, TAD753GE, TAD754GE
Removal
1 Remove the fan; refer to 26-3, Fan, change.
2 Remove the coolant pump; refer to Coolant Pump, Change page 189.
3 Remove the fuel filter bracket; refer to Fuel filter housing, change page 110.
4 Remove the electrical connection (1) from the oil pressure sensor. Remove the cable clamps, preheater (option, 2).
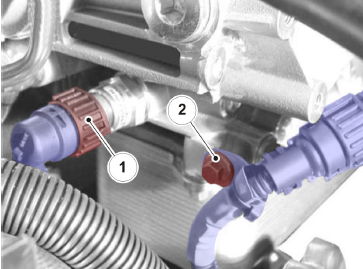
5 Remove the oil filter housing.
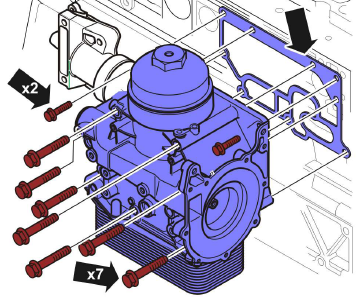
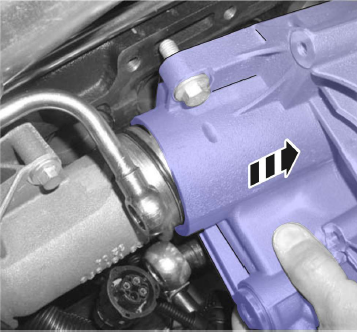
6 Pull the oil filter housing forward slightly and lift it away.
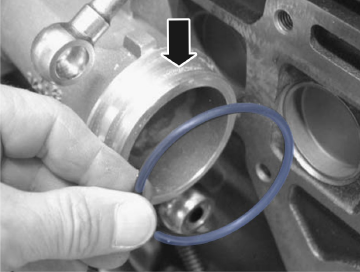
7 Remove the seal ring.
Installation
NOTICE! Clean the sealing surfaces.
NOTICE! Use new seals.
8 Place the gasket on the oil filter housing. Use the two short bolts to hold the gasket in place during installation.
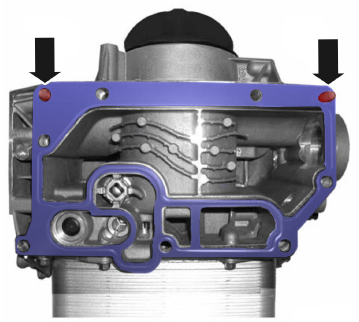
9 Guide the oil filter housing onto the coolant collar.
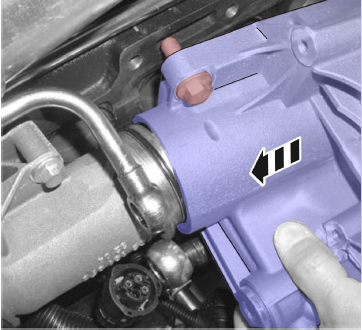
10 Adjust the oil filter housing and fasten. Tightening torque: 60 Nm (44.3 lbf.ft.)
11 Fit the electrical connection (1) to the oil pressure sensor. Connect the cable (2) to the preheater (option).

12 Install the coolant pump according to Coolant Pump, Change page 189.
13 Install the fuel filter bracket according to Fuel filter housing, change page 110.
14 Install the fan; refer to 26-3, Fan, change.
15 Carry out a function check.
Oil Cooler, Replace
TAD550GE, TAD551GE, TAD750GE, TAD751GE
Removal
1 Drain the coolant; refer to Coolant, Change page 187.
2 Remove the fuel filter bracket; refer to Fuel filter housing, change page 110.
NOTICE! Be prepared to gather up fluids.
3 Remove the oil filter (1).
4 Remove the oil dipstick (2).
5 Disconnect the oil pressure sensor (3).

6 Remove the oil cooler housing.

7 Remove the Allen plugs (1).
8 The undo the Allen bolts (2) and remove the oil cooler (3).
9 Inspect the oil cooler and if necessary pressure test before installation; refer to 22-3, Oil Cooler, Leakage Check.

10 Remove the O-rings and unscrew the Allen bolts.

11 Remove the aluminum washer.

Installation
NOTICE! Use adhesive film, protective tape during installation.
12 Replace the aluminum washers on the Allen bolts.
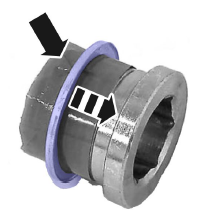
13 Install the O-ring and oil it lightly.
14 Remove the adhesive film, protective tape.

15 Install the oil cooler (1) in the oil cooler housing.
16 Tighten the Allen bolts (2). Step 1: Tightening torque: 80 Nm (59.0 lbf. ft.)
Step 2: Tightening torque: 160 Nm (118.0 lbf. ft.) 17 Fit the O-rings to the Allen plugs (3) and oil them lightly. Tightening torque: 80 Nm (59.0 lbf. ft.)
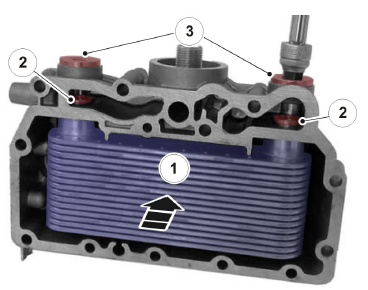
17 Fit the O-rings to the Allen plugs (3) and oil them
lightly.
Tightening torque: 80 Nm (59.0 lbf. ft.)
IMPORTANT!
Inspect the mating surface before installation.
18 Install the oil cooler housing and gasket.
NOTICE! Different bolt lengths.
• 3 x M8 x 50 mm
• 10 x M8 x 80 mm

19 Tightening sequence: Diagonal.
Step 1: Tightening torque: 3 Nm (2.2 lbf. ft.)
Step 2: Tightening torque: 30 Nm (22.1 lbf. ft.)
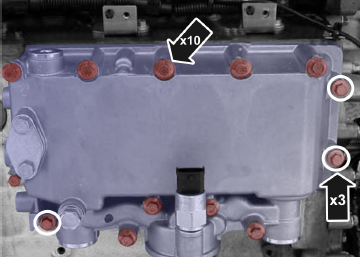
20 Install the oil filter (1).
21 Install the oil dipstick (2).
22 Connect the oil pressure sensor (3).
23 Install the fuel filter bracket; refer to Fuel filter housing, change page 110.
24 Fill with coolant; refer to:
- Coolant Level, Checking and Topping Up page 185.
- Administration page 16.

25 Check the oil level.
26 Carry out a function check.
Oil Cooler, Replace
TAD752GE, TAD753GE, TAD754GE
Removal
NOTICE! Be prepared to gather up fluids.
1 Drain the coolant; refer to Coolant, Change page 187.
2 Remove the oil cooler.
3 Remove the seals.

Installation
4 Re-install the oil cooler on the oil filter housing. Tightening torque: 22 Nm (16.2 lbf. ft.)
5 Fill with coolant; refer to:
- Administration page 17.
- Coolant Level, Checking and Topping
Up page 185.
6 Carry out a function check.
Copyright © Guangxi Dingbo Generator Set Manufacturing Co., Ltd. All Rights Reserved | Sitemap
Update cookies preferences