Lubrication System
Oil change intervals may vary according to the lubrication oil grade, fuel sulfur content and running conditions. Refer to Oil recommendations. The oil change interval may under certain conditions be increased. To see if the engine complies Volvo Penta oil analysis needs to be performed. Contact your Volvo Penta dealer for further information.

NOTICE! Oil change intervals must never exceed a period of 12 months.
Oil level, checking and topping up
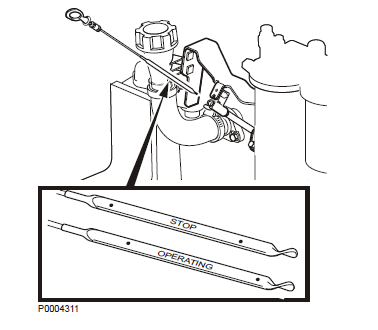
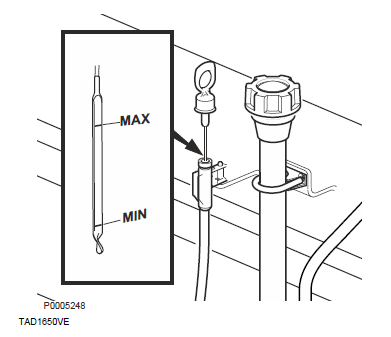
The oil level must be inside the marked area on the dipstick and must be checked daily before the first start.
• Top up with oil via the filler opening; refer to Maintenance, page 45.
• The oil level can be read both when the engine is stationary (the STOP side of the dipstick) and with the engine running (the OPERATING side of the dipstick).Do not fill above the maximum oil level. Only use a recommended grade of oil, please refer to Technical Data, page 74
• The oil level sensor only measures the oil level at the time when the ignition is turned on. In other words, not continually during operation.
TAD1650VE
The oil level must be inside the marked area on the dipstick and must be checked daily before the first start.
Top up with oil via the filler opening, located on the side of the engine. Check that the correct level has been achieved. If the engine is stationary, wait for a few minutes to allow the oil to run down into the oil pan.
IMPORTANT!
Do not fill up above the maximum oil level. Only use a recommended grade of oil, please refer to Technical Data, page 74.
Engine Oil, Change
WARNING!
Hot oil and hot surfaces can cause burns. Oil changes must be done when the Volvo engine is hot.
1 Connect the drain hose to the oil drain pump and check that no leakage can occur.
2 Pump the oil out (or remove the bottom drain plug and drain the oil). Collect all the old oil and old filters, and hand them to a re-cycling station for destruction.
3 Remove the drain hose (or install the bottom drain plug).
4 Fill with engine oil.
For change volume, please refer to Technical Data, page 74.

Oil Filter/By-pass Filter, Change
WARNING!
Hot oil and hot surfaces can cause burns.
1 Clean the oil filter bracket (2).
2 Remove all oil filters with a suitable oil filter extractor (1).
3 Clean the mating surface of the oil filter bracket. Make sure that no pieces of old oil seal are left behind. Carefully clean round the inside of the protective rim (2) on the oil filter bracket.
4 Put a thin layer of engine oil on the seal rings of the new fuel filters.
5 Install the new oil filters. Tighten the filters ¾–1 turn after they touch.
6 Top up with engine oil, start the engine and let it run for 20-30 seconds.
7 Turn off the engine, check the oil level and top up as required.
8 Check sealing round the oil filters.

Fuel System
Fire hazard. When carrying out work on the fuel system make sure the engine is cold. A fuel spill onto a hot surface or an electrical component can cause a fire. Store fuel soaked rags so that they cannot cause fire. Store fuel-soaked rags so that they cannot cause fire.
IMPORTANT:
Always observe the greatest cleanliness during refueling and work on the fuel system. Only use the grades of fuel recommended in the fuel specification.
Draining condensate, fuel system
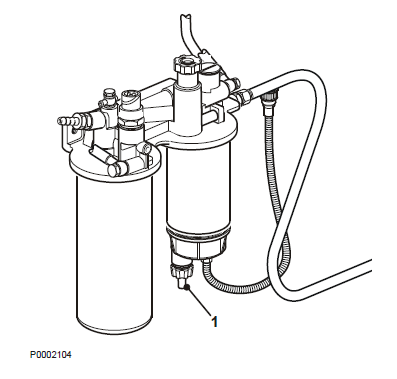
NOTICE! Put a collection vessel under the fuel filter tocollect the condensate and fuel.
1 Open the drain nipple (1) in the base of the fuel prefilter.
2 Tighten the drain tap (1) when fuel without water starts to run out.
Engine Fuel Filter Replacement
WARNING!
Fire hazard. When carrying out work on the fuel system make sure the engine is cold. A fuel spill onto a hot surface or an electrical component can cause a fire. Store fuel soaked rags so that they cannot cause fire.
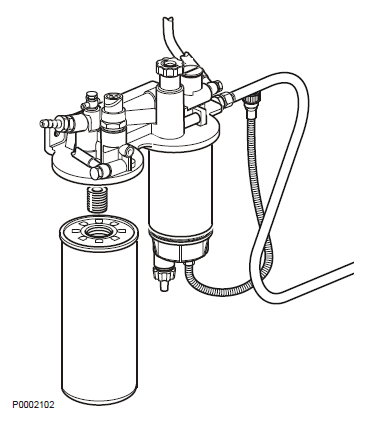
IMPORTANT:
Do not fill the new fuel filter with fuel before assembly. There is a risk that contamination could get into the system and cause malfunctions or damage.
1 Clean round the fuel filter.
2 Remove the filter with a suitable filter remover. Collect any spilled fuel in a collection vessel.
3 Clean the filter mating surface on the filter bracket.
4 Lubricate the seal with diesel fuel and install the new fuel filter. Tighten the fuel filter in accordance with the instructions on the fuel filter.
5 If necessary, vent the fuel system, please refer to Bleeding the Fuel System, page 58.
Fuel Pre-filter, Change
1 Undo the cable from the water trap sensor.
2 Remove the water trap filter from the filter housing. Collect any spilled fuel in a container.
3 Remove the lower part of the water trap from the filter.
4 Clean the lower part of the water trap with a soft rag. Check that the drain hole in the lower part is not blocked.
5 Install a new seal on the lower part and lubricate the seal with diesel fuel. Re-install the lower part of the filter.
6 Lubricate the seal with diesel fuel. Screw the filter onto the filter bracket by hand until the rubber seal just touches the mating surface. Then tighten a further half turn, no more.
7 Connect the cable to the water trap sensor.
8 If necessary, vent the fuel system, please refer to Bleeding the Fuel System, page 58.

Bleeding the Fuel System
The system does not need to be bled unless it has been run completely dry. Purging is then done with the hand pump on the fuel filter bracket.
Cooling System
The engine's internal cooling system makes sure the engine works at the right temperature. It is a closed system that must always be filled with a mixture of concentrated coolant and water in order to protect the engine against internal corrosion, cavitation and bursting due to freezing.
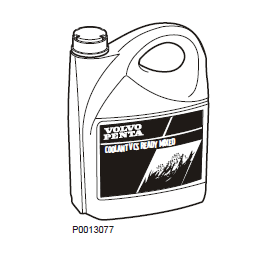
Coolant of a suitable chemical composition must be used all year round. This also applies in areas where there is never any risk of freezing, to provide the engine with full corrosion protection. The use of anti-corrosion agents alone is not permitted in Volvo Penta engines.
Never use water alone as a substitute for coolant. The corrosion protection additives become less effective over time, which means that the coolant must be changed at regular intervals; refer to Maintenance Schedule. The cooling system must be flushed whenever the coolant is changed; refer to the Cooling System, Cleaning, page 65section.
Volvo Penta coolants have been prepared to work best with Volvo Penta engines and offer excellent protection against corrosion, cavitation damage, and bursts due to freezing. Only coolants of this quality are adapted to, and approved by, Volvo Penta.
IMPORTANT!
Volvo Penta engines are delivered with Volvo Penta Coolant VCS (yellow). The coolant is available as concentrates and Ready Mixed. We recommend that the coolant supplied with the engine on delivery be used. Future warranty claims related to engine and accessories may be denied if an unsuitable coolant has been used, or if the instructions for coolant mixture have not been followed. Engines using yellow Volvo Penta Coolant VCS must have a yellow decal with the text VOLVO COOLANT VCS on the expansion tank. Coolant filters may not be used together with Volvo Penta Coolant VCS.
Ready Mixed
The ready-mixed coolant protects the engine from corrosion damage, cavitation damage and bursts due to freezing down to -24 °C (-11 °F) Volvo Penta Coolant VCS (yellow).
Coolant, Mixing
WARNING!
All coolant is hazardous and harmful to the environment. Do not consume. Coolant is flammable.
IMPORTANT!
Different types of coolant must not be mixed with each other.
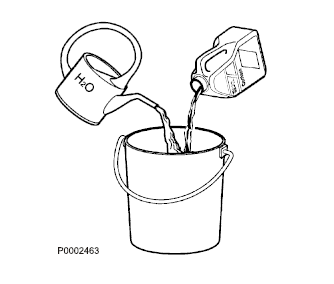
The concentrated coolant must be mixed with pure water (distilled or de-ionized water) according to specifications; refer to Water Quality, page 79.
Mix: 40% concentrated coolant and 60% water
This mixture prevents against internal corrosion, cavitation and bursts due to freezing down to -24°C (-11°F) Volvo Penta Coolant VCS (yellow). At 60% concentrated coolant the freezing point is lowered to -46°C (-51°F) Volvo Penta Coolant VCS (yellow).
Never mix in more than 60% of the concentrated coolant. A greater volume of concentrate entails a reduced cooling effect with the risk for overheating and reduced anti-freeze protection.
It is extremely important that the system be filled with the correct coolant concentration. Mix in a separate clean vessel before filling the cooling system. Make sure that the liquids mix. Maintenance 60
For More Volvo Engine workshop information, please visit:
Volvo Engine Diagnostic Function
Volvo Connection and Parameter Setting
Copyright © Guangxi Dingbo Generator Set Manufacturing Co., Ltd. All Rights Reserved | Sitemap
Update cookies preferences